To best understand this lab, follow along with the walkthrough video.
The scene we will simulate includes a ball attached to the center of the screen by a spring. However, instead of colliding with the center of the screen, it will pass through and oscillate around the center. This seems like it would be impossible in the real world, but we can think of our simulation as a 2D top-down view of the following image:
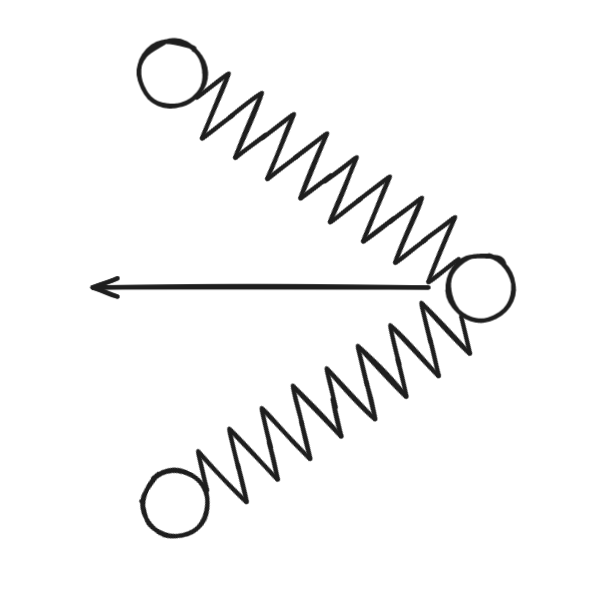
Since there are two springs at a 45 degree angle, the ball will be pulled to the left and the net force on the y-axis will be zero. However, it will not collide with anything when it passes through the center. When viewed from the top down, we wouldn't see any separation between the two posts that the springs are attached to, so it would appear as a single spring.
The Engine
SIMple Physics has two main components: the visualization and the scripting engine. The visualization shows a 2D representation of a physics scene. The default is to show a simple orbit. If you click a shape, you can inspect and change its properties. You can also create a new body by using the create button in the top left, and then clicking and dragging.
Scripting
To use the scripting engine, click the Scripting tab at the top of the screen. To start out, try typing the following code in the editor:
print("Hello World");Then, running the code should show the output "Hello World".
This engine uses a scripting language called Rhai. For the purposes of this lab, no specific Rhai knowledge is required. However, if you want to learn, the example scripts on the right of the coding panel, along with the other labs on this website, might be a good start.
Starter code
This lab has some incomplete starter code that you will complete. There are three
functions you will edit: apply_spring_force(), calculate_kinetic_energy(), and
calculate_potential_energy(). If you are a coding beginner, don't worry, you'll only
have to write a few lines of code. If you're more advanced, try to understand the whole
script.
The starter code is below. Start by copy pasting it into your script editor. The next sections will guide you to fix the TODO lines and complete the script.
const SPRING_CONSTANT = 0.001; // unit: N/m
const DAMPING_FACTOR = 0.999; // unit: none
set_dt(1.0);

set_g(0.0);

fn apply_spring_force(body) {
    draw_body_spring(body);
    let spring_length = (body.get_pos().x + body.get_vel().x); // unit: m

    let spring_force = 0.0; // unit: N
    body.add_force(vec(spring_force, 0.0));
}

fn calculate_kinetic_energy(body) {
    let m = body.get_mass(); // unit: kg
    let x = body.get_pos().x; // unit: m
    let v = body.get_vel(); // unit: m/s
    let v_mag = v.length; // unit: m
    return 0.0; // TODO, unit: J
}

fn calculate_potential_energy(body) {
    let x = body.get_pos().x; // unit: m
    let m = body.get_mass(); // unit: kg
    return 0.0 // unit: J
}

new_graph("Kinetic", 1000, 0, 0, 255);
new_graph("Potential", 1000, 255, 0, 0);
new_graph("Total", 1000, 0, 255, 0);

let update = |ids, bodies| {
    if (is_paused()) {
        return;
    }

    let total_kinetic_energy = 0.0;
    let total_potential_energy = 0.0;
    for body in ids {
        apply_spring_force(body);
        body.set_vel(body.get_vel() * DAMPING_FACTOR);

        let body_kinetic_energy = calculate_kinetic_energy(body);
        let body_potential_energy = calculate_potential_energy(body);

        // add the body's energy to the total
        total_kinetic_energy += body_kinetic_energy;
        total_potential_energy += body_potential_energy;
    }

    let total_energy =
        total_kinetic_energy + total_potential_energy;

    add_point("Kinetic", total_kinetic_energy);
    add_point("Potential", total_potential_energy);
    add_point("Total", total_kinetic_energy + total_potential_energy);
};

fn draw_spring(start, end, width, thickness, coils) {
    let r = end - start;
    let incr = r / coils;
    let offs = incr.rotate(3.1415 / 2.0).normalized * width;

    let pos = start;
    for i in 0..coils {
        let p1 = pos + (incr / 3.0) + (offs / 2.0);
        let p2 = pos + (incr * 2.0/3.0) - (offs / 2.0);
        let p3 = pos + incr;
        draw_line(pos, p1, thickness);
        draw_line(p1, p2, thickness);
        draw_line(p2, p3, thickness);
        pos = p3;
    }
}

fn draw_body_spring(body) {
    draw_spring(
        vec(0.0, body.get_pos().y),
        body.get_pos(),
        body.get_radius() * 2.0,
        body.get_radius() / 2.0,
        10
    );
}
Spring Forces
To start out, we'll calculate the spring force. Specifically, we'll apply a spring force to every object towards the center of the screen.
Look at the apply_spring_force() function:
fn apply_spring_force(body) {
    draw_body_spring(body);
    let spring_length = (body.get_pos().x + body.get_vel().x); // unit: m

    let spring_force = 0.0; // unit: N
    body.add_force(vec(spring_force, 0.0));
}
To fix the TODO on line 5, replace 0.0 with the formula for spring force using the variables
SPRING_CONSTANT and spring_length. Then, run the script and add a body slightly
off from the center of the screen. What happens? If you've done it correctly, the body
should bounce back and forth.
Energy
Next, update the calculate_kinetic_energy() function to graph the system. You can use
v_mag**2 to get the square of the velocity's magnitude.
fn calculate_kinetic_energy(body) {
    let m = body.get_mass(); // unit: kg
    let x = body.get_pos().x; // unit: m
    let v = body.get_vel(); // unit: m/s
    let v_mag = v.length; // unit: m
    return 0.0; // TODO, unit: J
}
Finally, update the calculate_potential_energy() function:
fn calculate_potential_energy(body) {
    let x = body.get_pos().x; // unit: m
    let m = body.get_mass(); // unit: kg
    return 0.0; // TODO
}
Now, look at the graph with a single spring. Is it as expected?
Questions
-
When is the potential energy maximized, and when is the kinetic energy maximized?
-
You might notice that the total energy of the system decreases over time. This is because computational integration error can make the energy increase over time, so we added a
DAMPING_FACTORto counter that and make it decrease instead. This approximates forces like friction and air resistance in the real world.Try making the simulation as accurate as possible, preserving the energy over time. To do so, adjust the
DAMPING_FACTORconstant and the timestep using theset_dt()call at the top. How does increasing/decreasing theDAMPING_FACTORanddtaffect the graph? -
Extra (Very Hard): Try playing with https://cloth.mikail-khan.com. This cloth simulator uses spring constraints between every node. However, it doesn't use anything like the
apply_spring_forcesfunction above. Instead, it uses a spring constraint solving approach which updates the positions directly. Otherwise, computational integration isn't fast enough to keep up with tight springs. Try implementing this approach in your own script, and see how the energy is preserved. You can find the source code for the cloth simulator here: https://github.com/mkhan45/clothsim. If you get it to work, email me: mikail@purdue.edu